The Japanese Rules of Go
April 10, 1989 (Effective May 15, 1989) Translated by James Davies
Diagrams entered by Jonathan Cano
Reformatted, adapted, and edited by Fred Hansen
The Nihon Kiin and Kansai Kiin hereby revise the Nihon Kiin's Rules of Go formulated in October 1949 and establish the Japanese Rules of Go. These rules must be applied in a spirit of good sense and mutual trust between the players.
Article 1. The game of go
Go is a game in which two players compete in skill on a board, from the beginning of the game until the game stops according to Article 9, to see which can take more territory. A "game" refers to the moves played until the "end of the game."
Article 2. Play
The players can alternately play one move at a time, one player playing the black stones, his opponent the white stones.
Article 3. Point of play
The board is a grid of 19 horizontal and 19 vertical lines forming 361 intersections. A stone can be played on any unoccupied intersection (called an "empty point") on which Article 4 permits it to exist. The point on which a stone is played is called its "point of play."
Article 4. Stones that may exist on the board
After a move is completed, a group of one or more stones belonging to one player exists on its points of play on the board as long as it has a horizontally or vertically adjacent empty point, called a "liberty." No group of stones without a liberty can exist on the board.
Article 5. Capture
If, due to a player's move, one or more of his opponent's stones cannot exist on the board according to the preceding article, the player must remove all these opposing stones, which are called "prisoners." In this case, the move is completed when the stones have been removed.
Article 6. Ko
A shape in which the players can alternately capture and recapture one opposing stone is called a "ko." A player whose stone has been captured in a ko cannot recapture in that ko on the next move.
Article 7. Life and death
1. Stones are said to be "alive" if they cannot be captured by the opponent, or if capturing them would enable a new stone to be played that the opponent could not capture. Stones which are not alive are said to be "dead."2. In the confirmation of life and death after the game stops in Article 9, recapturing in the same ko is prohibited. A player whose stone has been captured in a ko may, however, capture in that ko again after passing once for that particular ko capture.
Article 8. Territory
Empty points surrounded by the live stones of just one player are called "eye points." Other empty points are called "dame." Stones which are alive but possess dame are said to be in "seki." Eye points surrounded by stones that are alive but not in seki are called "territory," each eye point counting as one point of territory.
Article 9. End of the game
1. When a player passes his move and his opponent passes in succession, the game stops.2. After stopping, the game ends through confirmation and agreement by the two players about the life and death of stones and territory. This is called "the end of the game."
3. If a player requests resumption of a stopped game, his opponent must oblige and has the right to play first.
Article 10. Determining the result
1. After agreement that the game has ended, each player removes any opposing dead stones from his territory as is, and adds them to his prisoners.2. Prisoners are then filled into the opponent's territory, and the points of territory are counted and compared. The player with more territory wins. If both players have the same amount the game is a draw, which is called a "jigo."
3. If one player lodges an objection to the result, both players must reconfirm the result by, for example, replaying the game.
4. After both players have confirmed the result, the result cannot be changed under any circumstances.
Article 11. Resignation
During a game, a player may end the game by admitting defeat. This is called "resigning." The opponent is said to "win by resignation."
Article 12. No result
When the same whole-board position is repeated during a game, if the players agree, the game ends without result.
Article 13. Both players lose
1. After the game stops according to Article 9, if the players find an effective move, which would affect the result of the game, and therefore cannot agree to end the game, both players lose.2. If a stone on the board has been moved during the game and the game has proceeded, the game continues with the stone returned to its original point of play. If the players cannot agree, both players lose.
Article 14. Forfeit
Violation of the above rules causes immediate loss of the game, provided the result has not yet been confirmed by both players.
COMMENTARY ON THE JAPANESE RULES OF GO
Commentary on Article 1, The game of go
Unless resumed, the game lasts until stopped by both players passing in succession. (See Articles 2, 9, and 10 for details.)
Commentary on Article 2, Play
1. The players have the right to play alternately.2. To declare that the game should stop, a player passes. If his opponent passes in succession, the game stops and neither player can play next. (See Article 9, clause 1.)
Commentary on Article 3, Point of play
1. Being for professional players, these rules stipulate a 19 x 19 board.
The players may of course agree to use other boards, such as a 9 x 9 beginners' board, a 13 x 13 board, or (in the future) a 21 x 21 board.2. Intersection, empty point, and point of play
There are 361 intersections like that at 1 in Diagram 1. An intersection on which no stone has been placed is called an empty point. An intersection on which a stone like 1 has been placed is called its point of play.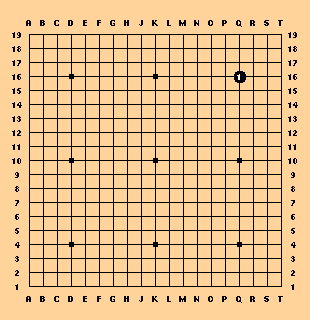
Diagram 1. Intersections on the board.
3. Empty points that cannot be played on because of Article 4
A player cannot play a move that would deprive his own stones of liberties, so that they could not exist on the board. For example, Black cannot play at any point marked x in Diagram 2. Note that Black can play at A because the resulting black group would have a liberty.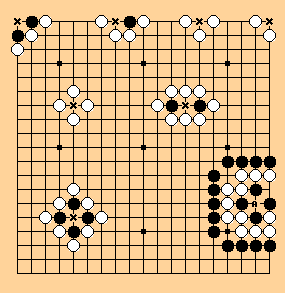
Diagram 2. Black cannot play at x, but can play at A.
Commentary on Article 4, Stones that may exist on the board
Stones that cannot exist: the white stones in Diagram 3 have no vertically or horizontally adjacent liberties, so they cannot exist on the board.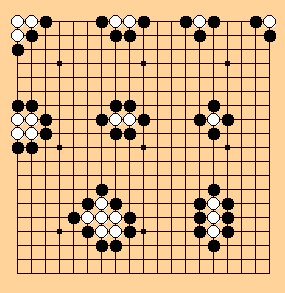
Diagram 3. Stones that cannot exist on the board
Commentary on Article 5, Capture
Captured stones:
Black must remove all the white stones in Diagram 4, because when Black 1 is played, the white stones have no more horizontally or vertically adjacent liberties, so they cannot exist on the board. Removing the stones completes the move.Removing the triangled stones at the end of the move creates liberties which enable Black 1 to be played according to Article 4.
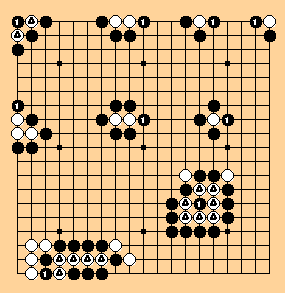
Diagram 4. Black 1 captures white stones.
Commentary on Article 6, Ko
1. Shapes in which the players can alternately recapture one opposing stone
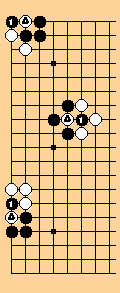
In Diagram 5a, Black can capture the triangled white stones with move 1, and White can recapture Black 1.a
 b
b 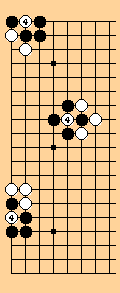
Diagram 5 Kos.
2. Prohibition of recapture on the next move
After Black 1 in Diagram 5a, White cannot play at 4 in Diagrams 5b to recapture unless he first plays at least once elsewhere. A move played elsewhere for this purpose is called a "ko threat."3. If a player recaptures on the next move without making a ko threat, he forfeits the game (Article 14).
Commentary on Article 7, Life and death
1. Examples of stones that are alive because they cannot be captured by the opponent.
All the stones in Diagram 6 are alive.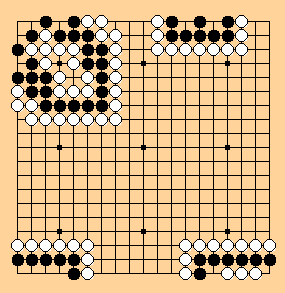
Diagram 6. Live stones. (The lower right stones are alive in seki, Article 8.)
2. Examples of stones that are alive because capturing them would enable a new stone to be played that the opponent could not capture.
In Diagram 7 White can capture Black on the next move at any of the x points, but Black can then play a stone that White cannot capture. This is known as a snapback. The black stones are therefore alive.
Diagram 7. Examples of snapback
(Note that the definition of "stones that cannot be captured" is recursive. The two black stones on the right are alive because when White captures them it enables Black to play as shown on the left. The black stone on the left is alive because when White captures it Black can recapture.)
3. Examples of dead stones
The black stones in Diagram 8 are all dead.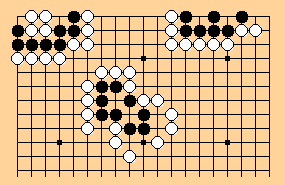
Diagram 8. Dead stones. The black stones are dead.
Commentary on Article 7, Life and death, Clause 2
Clause 2 of Article 7 states how to settle unclear questions of life or death involving ko after the game stops (see Article 9, clause 1).
1. When the game stops, ko recapturing also stops.
Even if a player has unlimited ko threats (in a double-ko seki for example), he cannot use them to recapture a ko. Diagram 9 is an example of prohibition of recapture in a direct ko.
Diagram 9
Black does not play A and claims that the game has ended. What happens? If the game ends in this way, the black group and the white stone are both dead. See Life-and-Death Example 9, below. It is clear the white stone is dead because Black can capture it by playing at A. The black stones are dead because when White captures by playing at B, Black must pass for that ko and then White captures the six remaining black stones by playing at A.
2. If a player whose stone has been captured in a ko has passed for that particular ko
, the situation for that ko is the same as if the game had been resumed: the player may now capture in that ko again.
Diagram 10 Approach-move ko: an example of capturing again after passing.
The question in Diagram 10 is whether the game can end without Black's playing at A. The answer: If White does not actually fight the ko and the game ends in this position, the eight black stones are alive and the white stone is dead. Black does not have to add a move at A. See Life-and-Death Example 10.
3. Approach-move ko with double-ko seki (example of capturing again after passing for that particular ko capture).
Suppose positions in Diagram 11 are both present on the board. The question is whether the game can end without Black's playing at A. The answer: If the game ends in this way, the white stone is dead despite the double ko in the position at the right. Black does not have to add a stone at A.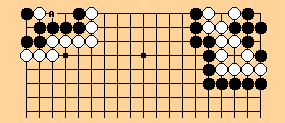
Diagram 11.
The reason the white stone is dead is as follows.
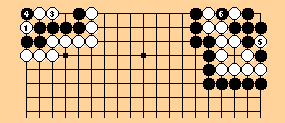
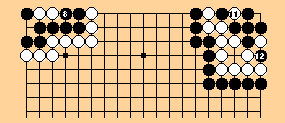
- White 1 takes ko (on left) and Black 2 passes because recapturing is prohibited except after passing. White 3 gives atari. Black 4 retakes ko, a legal play because Black has passed once for this ko (in lieu of Black 2). White 5 takes a ko on the right and Black 6 takes the other ko. White 7 passes for the left ko, because recapturing without first passing is prohibited.
- Black 8 captures two white stones on the left. White 9 and Black 10 pass for kos on the right. White 11 takes ko; this is legal because White has passed at play 9. Black 12 takes ko; this is legal because Black has passed
Note that if White 7 was a pass for the ko 6/11 on the right, Black could have played 8 at 12 and captured the white group on the right. White could still not capture on the left and that Black group would remain alive.
Commentary on Article 8, Territory
The basic principle is that territory consists of points surrounded by completely independent live groups. Stones with dame that are alive in seki are not independently alive, so the points they surround are not territory.1. Eyes and territory
Points a to d in Diagram 12 are eye points. The Black group surrounding them is completely alive, so they are territory.
Diagram 12. Eye Points.
2. Seki and dame
Point a, in Diagram 13, is a dame. The ten black stones and four white stones are live stones with dame, so they are alive in seki. The points marked x are eye points but are not territory because the surrounding group is alive in seki.
Diagram 13. Seki and Dame.
3. Double ko seki
In Diagram 14, points a and b are dame because they are not surrounded by live stones of one player. The six black and twelve white stones are live stones possessing dame, so they are alive in seki. (See Life-and-Death Example 25 for details.) The points marked x are not territory because they are surrounded by stones that are alive in seki.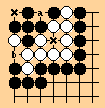
Diagram 14. Double-ko seki.
4. Filling in the dame to confirm territory
In the position in Diagram 15, the black and white groups are both alive, but in seki because of the dame at A, so neither side has any territory. A move at A is needed to make Black's and White's eyes into territory.
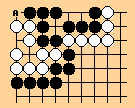
Diagram 15.
Commentary on Article 9, End of the Game, Clause 1
A pass is a declaration that the game may stop. The game stops when both players pass in succession. That is, the game stops when both players indicate that they wish to pass.
Commentary on Article 9, End of the Game, Clause 2
1. Confirmation of the life and death of stones and territory requires that the players fill the dame and add any necessary stones inside their territory, in accordance with Article 8.2. If the players agree, they may fill the dame and add other necessary stones after stopping the game, in which case these are not moves as defined by the rules, and need not be played according to the rules.
Commentary on Article 9 (end of the game) Clause 3
1. "If a player requests resumption..."
The game is released from its stopped state and competition resumes.
2. "...his opponent...has the right to play first."
a. If a game is resumed, any moves played not in accordance with the rules during the period when the game was stopped are invalid {and are presumably removed from the board. --wjh}b. Arguments over who plays first are resolved by stating that the opponent of the player who requests resumption may play first.
3. "...his opponent must oblige..."
If the opponent does not see any need to play, he may pass.
Commentary on Article 10, Determining the Result, Clause 1
A player does not have to remove opposing dead stones from his territory by occupying all their liberties as in Article 5. He can remove them as is, without making further moves.
1. Example of a stone that can be removed as is after the end of the game.
After the end of the game, the white stone in Black's territory in Diagram 16 is dead, so Black can remove it without further play.
Diagram 16
2. Example of stones that cannot be removed as is after the end of the game
The black stones marked with triangles in Diagram 17 are dead, but White is alive in seki, so the points are not his territory. White therefore cannot remove these two black stones as is.
Diagram 17
Note: Before the end of the game, White can play A to capture the two black stones, then capture another stone which Black has to throw in.
Commentary on Article 10, Determining the Result, Clause 2
If there are more prisoners than opponent's territory, the player adds the excess prisoners to his own territory when counting territory.
Commentary on Article 10, Determining the Result, Clause 3
The players have a duty to reconfirm the result, by replaying the game from the beginning for example. They cannot refuse to reconfirm the result.
Commentary on Article 10, Determining the Result, Clause 4
Once the result is confirmed, it cannot be changed even if more prisoners are found, or if examination of the game record shows that a player has played twice in a row, recaptured in a ko without making a ko threat, or made another illegal move (which according to Article 14 would result in immediate loss by forfeit before confirmation of the result).
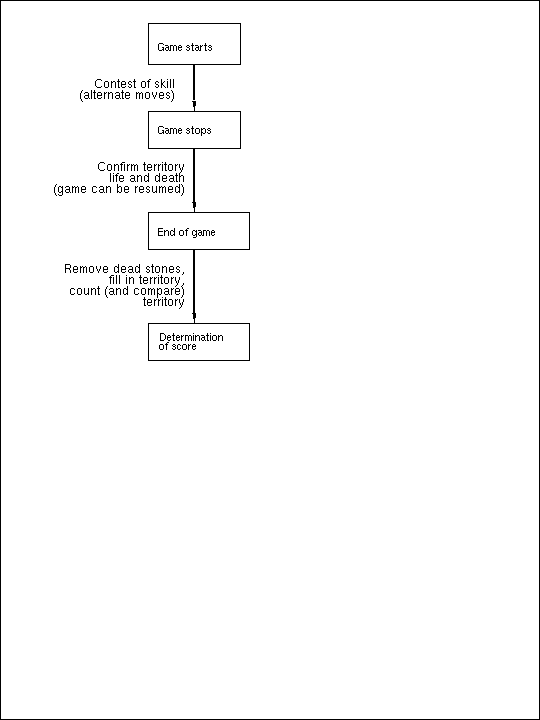
Articles 1, 2, 9, and 10 are illustrated below
Commentary on Article 12, No Result
1. Examples of repetition of the same whole-board position
This may occur in a triple or higher-order ko, round-robin ko, long life, etc. ee Diagrams 18.
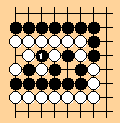
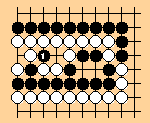

Diagram 18. Triple ko, round-robin ko, and long life
2. "...if the players agree, the game ends without result."
In consideration of the difficulty of checking the repetition cycle, the game ends without result if both players agree.
Commentary on Article 13, Both Players Lose, Clause 1
If an effective move is discovered after both players have passed, such as a move that neither player can afford to let his opponent make, and neither player requests that the game resume but the players do not agree to end the game, then both players lose.In the positions in Diagrams 19, after the game has stopped both players discover effective moves at A. Suppose both players would lose if their opponent played A, so neither requests resumption of the game. Then if the players do not agree that the game has ended, both players lose.
a b
b
Diagram 19.
Commentary on Article 13, Both Players Lose, Clause 2
If the players cannot agree about returning the stone to its original point of play, if another stone has already been played on this point, if the stone could no longer exist on the board at this point, or if for some other reason the stone cannot be returned to its original point in accordance with the rules, then both players are held responsible and both lose.1. Note that if the game were to continue as is, it would not be possible to make a game record. {Nonsense, it doesn't seem any harder than recording a ko fight. --wjh}
2. Note that the reason for having both players lose is that if the game were declared to end without result, a player who found himself behind might move stones intentionally.
Commentary on Article 14, Forfeit
1. If an illegal move has been played
and the result of the game has not yet been confirmed, the game is forfeited at the point of the illegal move. Note: If the violation is discovered after the result has been confirmed, according to Article 10 clause 4, the result does not change.2. Examples of illegal moves:
playing twice in succession; capturing in a ko without making a ko threat.
EXAMPLES OF CONFIRMATION
OF LIFE AND DEATH
The results in the following examples would be reached through confirmation of life and death if the game stopped in the position shown in the diagram. They do not prevent these positions from being resolved through actual play before the end of the game.
OF LIFE AND DEATH
1. Positions Related to Article 7, Clause 1
Life-and-Death Example 1: Three Points Without Capturing

If the game ends as shown in the diagram, the white stone and the four black stones are both alive. By Article 8, the position is a seki.
The black stones are alive in the confirmation phase as follows:

White plays 1 to capture 4 black stones.
Black is now able to play 2, a stone which cannot be captured.
The four black stones are alive because capturing them enables the play of a stone (2) which is alive (in that it itself cannot be captured).
The white stone is alive in the confirmation phase as follows:

Black 1 captures a white stone.
White 2 recaptures.
Black plays 3 and white 4. Black captures with 5. White can play 6.
Caturing the one white stone enables the play of two white stones at 4 and 6 which cannot be captured, so the original white stone is alive.
Before the end of the game, either Black or White can play A to resolve the position by actual play.
If White plays A first, capturing four black stones:

Black plays 2. White plays 3. Black 4 captures three white stones.
White plays 5. Black 6 connects at the left of 2 (or plays at the left of 3 for a ko). White 7 captures a black stone (or begins the ko fight).
White captures 5 black stones; Black captures 3 white stones; White gains 2 points. (If Black plays and wins the ko, White gains 1 point.)
If Black plays A first (capturing a white stone)


White plays 2, capturing five black stones. Black plays 3. White plays 4.
Black plays 5, capturing a white stone. White 6 connects (or White starts a ko fight). Black 7 fills at 2 (or responds to the ko threat).
White captures 5 stones and Black captures 2; White gains 3 points. (If white plays and wins the ko, White gains 7 points.)
Life-and-Death Example 2

This position is a seki. Black does not have to play A.
Reason why the two black stones are alive:

If White captures Black's two stones, Black can play two new stones (at 2 and 4) which White cannot capture. Since there is a dame, the position is a seki.
Life-and-Death Example 3: Hane-Seki
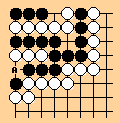
Black and White are both alive. By Article 8, the position is a seki. Neither player will play at A.
If White captures by playing at A,
Black will capture the entire corner.
Or if Black captures by playing at A
Black cannot avoid losing the entire corner. (Making responses to 2 and 4 is no better.)
Since neither player plays at A, the position remains as in the original diagram. It is a seki because there are dame.
Life-and-Death Example 4
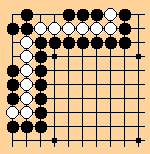
Black and White are both alive. By Article 8, the position is a seki. Black can gain 9 points by capturing one of the white groups before the end of the game instead of leaving the position as a seki.
Black gets 8 prisoners and 9 points of territory, while White gets 6 prisoners and 2 points of territory.
Life-and-Death Example 5

The enclosed black and white stones are all alive. By Article 8, the position is a seki.
If Black tries to capture White before the end of the game he loses one point: Black gets 5 prisoners and 3 points of territory while White gets 7 prisoners and 2 points of territory (ignoring the possibility of a ko). If White begins he can gain 1 point, getting 7 prisoners and 3 points of territory while Black gets 6 prisoners and 3 points of territory.
Life-and-Death Example 6: position before long life

The diagram shows a position one move prior to the start of a long life. Black A would create long life (cho sei), causing the game to end without result. Suppose that White would lose by half a point if he played A. The question is what happens if the game ends with neither player playing A.
Black's ten stones are dead because they die if White plays A. White's four stones are alive because even if Black plays A, they survive in the ensuing long life. Black's ten stones are therefore dead stones in territory surrounded by live white stones. If the game ends as shown, White can remove the ten black stones as is, without having to play A.
2. Positions Related to Article 7, Clauses 1 and 2
These examples illustrate the special ko rule in force during the confirmation phase after both players have passed in successive turns. This ko rule allows a recapture of a ko only after a pass by the player about to make the recapture. Moreover, there must be one pass designated for each ko that is to be recaptured. For instance, if Black has captured two kos and White has not yet passed for either, then White will have to pass once for one of the kos and then again for the other. The recapture in the first ko can be before or after the pass for the second ko, it can even be after the recapture in the second ko. Example 7-2 will illustrate why each pass must be designated as to which ko it satisfies.
Life-and-Death Example 7-1: Bent Four in the Corner

The three black stones are alive and the seven white stones are dead.
Here is how Black can demonstrate capture of the white stones during the confirmation phase:

Black plays 1. White plays 2, capturing four stones.
Black plays 3. White plays 4. Black plays 5, capturing ina ko. White 6 passes (a pass is required bfore recapturing). Black 7 captures eight white stones.
Life-and-Death Example 7-2: Bent Four in the Corner and Thousand-Year Ko

The bent-four-in-the-corner of Life-and-Death Example 7-1 is dead even if a thousand-year ko, as shown here on the right, is also present on the board. Here is how Black can demonstrate capture of the seven white stones on the right, during the confirmation phase:

Black plays 1 and White plays 2, capturing four stones.
Black plays 3, White plays 4, and Black takes the ko at 5. White 6 is a ko threat in the thousand year ko. Black captures the righthand ko by playing at 7.
White 8 is a pass for the ko on the left and Black 9 takes eight white stones. White 10 passes for the ko on the right and Black 11 captures four white stones. (If White 8 had been the pass for the ko on the right, Black would have played 9 at 11.)
Life-and-Death Example 8: triple ko with an eye on one side
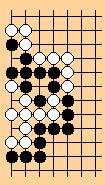
Black's nine stones are dead and White's ten are alive. {I would not call this a "real" triple ko, because the three kos are not all between the same two groups. --wjh}
In the confirmation phase, the black stones can be captured as follows.

White 1 takes the "outside" ko. Black 2 takes an inside ko. White 3 takes the other inside ko. Black 4 passes (for either the ko at 1 or 3). White 5 captures nine black stones.
Life-and-Death Example 9: Resolving a Direct Ko

If the game ends like this, Black and White are both dead but none of the stones can be removed. According to Article 8 there is no territory. Compared with playing A, Black loses 3 points.
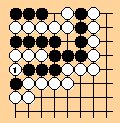
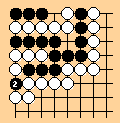
White's stone is clearly dead because Black can capture it at A. The reason why Black's seven stones are dead is as follows.


In the diagram at left, White takes ko at B, Black passes (he cannot recapture before passing), then White A captures six black stones.
Life-and-Death Example 10: approach-move ko

The question is whether Black has to play A before the end of the game. The answer: If White does not actually play out the ko and the game ends as shown, White's stone is dead, the eight black stones are alive, and Black does not have to play A.
Black's eight stones are alive for the following reason:
-

White 1 takes ko.
Black 2 passes (recapturing without first passing is prohibited).
White plays 3.
Black 4 recaptures the ko (legal because Black has passed).
White 5 passes (recapturing without first passing is prohibited).
Black 6 captures two white stones.
Life-and-Death Example 11: False Eye with Double Ko
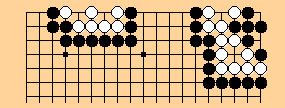
If both these positions are present on the board, the seven white stones on the left are dead while the enclosed black and white groups on the right are both alive in double-ko seki.
Here is why the seven white stone are dead:
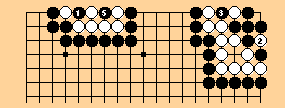
Black 1 takes ko on the left. White 2 takes ko on the right. Black 3 takes the other ko on the right. White 4 passes for the ko on the left. Black 5 captures the seven white stones on the left. White 6 passes for the right and Black 7 passes for the other ko on the right.
Life-and-Death Example 12: thousand-year ko

If the game ends with this position on the board, Black and White are both alive in seki. By Article 8, the position is a seki.
Why Black cannot kill the white stones:
-

Black 1 takes the ko. White 2 passes (no choice). Black plays 3.
White 4 takes ko. Black 5 passes (no choice). White 6 captures nine black stones.
The result through White 6 shows that White is alive if Black plays first. If White plays first to try to kill the Black group, it lives in the following sequence through Black 4.

White plays 1. Black 2 takes ko. White 3 passes (recapturing without first passing is prohibited). Black 4 captures five white stones.
Life-and-Death Example 13

Black and White are both alive. By Article 8, the position is a seki.
Here is why Black cannot kill White:

Black plays 1. White 2 captures three black stones.
Black 3 recaptures White 2. White 4 passes (or plays at x.)
Black plays 5, which is not a ko capture. White 6 takes ko. Black 7 passes. White 8 takes another ko. At 9, Black must pass for the second ko. White 10 captures the last two black stones.
Life-and-Death Example 14

The eight black stones are alive and the seven white stones are dead. To gain a seki, white has to play at A.
Life-and-Death Example 15
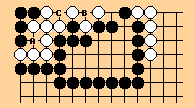
The four black stones are alive and the eleven white stones are dead.
Note: This question arises if White has no ko threats and the game ends with neither player making a move. White does not play A to start the ko because he would lose. Black does not play B and C to capture the white stones because this would cost him two points.
Life-and-Death Example 16
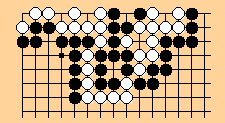
The ten white stones in the left corner are dead. The eleven white stones to the right also die through collapse of the seki.
Life-and-Death Example 17
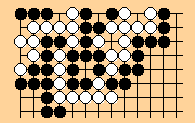
The three black stones in the corner are alive. The ten white stones surrounding them are dead. The eleven surrounded white stones to the right also die through collapse of the seki.
Life-and-Death Example 18
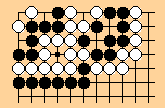
The seven black stones in the corner are dead. The black group in the center dies through collapse of the seki.
Life-and-Death Example 19
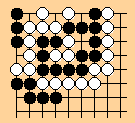
White is alive and Black is dead.
Life-and-Death Example 20
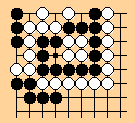
White and Black are both alive. By Article 8, the position is a seki.
Life-and-Death Example 21
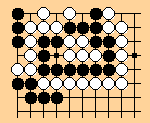
The nineteen black stones are alive and the fourteen white stones are dead.
Life-and-Death Example 22

The seven black stones are alive and the ten white stones are dead. Black does not have to add a move to capture the three white stones.
Life-and-Death Example 23
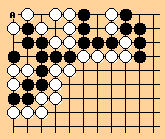
From Article 7 clauses 1 and 2 and the purpose of the game stated in Article 1, Black is alive and White is dead. If White plays A before the end of the game, the position becomes a seki, but Black can capture 9 white stones while White captures 1 black stone.
Life-and-Death Example 24: Filling Dame to Obtain Territory
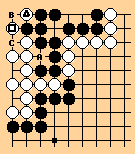
a. In this position, the black and white groups are both alive, but in seki because of the dame at A, so neither side has any territory. A move at A is needed to make Black's eyes into territory.
b. If there is a double-ko seki on the board, White can fight the kos at B and C. From Article 7, the triangled white stone is dead and the squared white stone is alive, so B is a dame and C is an eye.
c. Even if the dame at A is filled, White is alive in seki because of the dame at B, so White's two eyes and the point C are not territory. To get two points of territory, White must play at B and C.
Life-and-Death Example 25: Double-Ko Seki
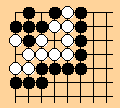
a. Black's five-stone group and White's eleven-stone group are alive but have dame at A and B. By Article 8, they are alive in seki.
b. The reason A and B are dame is as follows.
- (1) After the single black and white stones in the kos are captured.new black and white stones can be played, but these new stones are not uncapturable. The single black and white stones in the kos are therefore dead.
(2) Although A and B are empty points surrounded by stones of just one player, the surrounding stones include both live and dead stones. By Article 8, A and B are therefore dame, not eye points.
'퍼온~바둑..! > 관련 자료들~' 카테고리의 다른 글
| [=] 응창치룰Ing's SST Laws of Wei-Chi (0) | 2008.04.03 |
|---|---|
| [=] 중국룰The Chinese Rules of Go (0) | 2008.04.03 |
| [=] 한국기원룰 (0) | 2008.04.03 |
| [=] 한국바둑규칙 (0) | 2008.04.03 |
| [=] 중국바둑규칙 (0) | 2008.04.03 |
